Friday, August 3, 2012

Microsoft System Center Configuration Manager 2007 R3 - unable to download patches - 2. Failed to find updates with error code 800B0001

Hi Guys,

I recently worked upon SCCM case for failing downloading windows updates with below error therefore sharing it here in my blog with solution implemented so that it will help to whoever facing same issue.

Failed to find updates with error code 800B0001

OS- Microsoft Windows 2008 R2
Application - Microsoft SCCM 2007 R3

As Microsoft does not support with SP1 - See Here 
Check Windowsupdate.log & Patchdownloader.log file for error details.
Windowsupdate.log Finding:

2012-07-17          15:46:38:808       816        2168       Misc       WARNING: Error: 0x800b0001 when verifying trust for C:\Windows\SoftwareDistribution\SelfUpdate\wuident.cab
2012-07-17          15:46:38:808       816        2168       Misc       WARNING: Digital Signatures on file C:\Windows\SoftwareDistribution\SelfUpdate\wuident.cab are not trusted: Error 0x800b0001
2012-07-17          15:46:38:808       816        2168       Setup    WARNING: Self Update check failed to download package information, error = 0x800B0001
2012-07-17          15:46:38:809       816        2168       Setup    FATAL: Self Update check failed, err = 0x800B0001
2012-07-17          15:46:38:867       816        2168       Agent      * WARNING: Skipping scan, self-update check returned 0x800B0001
2012-07-17          15:46:38:922       816        2168       Agent      * WARNING: Exit code = 0x800B0001
2012-07-17          15:46:38:922       816        2168       Agent    WARNING: WU client failed Searching for update with error 0x800b0001
2012-07-17          15:46:38:938       816        11e4      AU          >>##  RESUMED  ## AU: Search for updates [CallId = {C4B3D200-5463-4446-9432-EB74507F131E}]
2012-07-17          15:46:38:938       816        11e4      AU            # WARNING: Search callback failed, result = 0x800B0001
2012-07-17          15:46:38:939       816        11e4      AU            # WARNING: Failed to find updates with error code 800B0001

Patchdownloader.log finding

Contentsource = http://download.windowsupdate.com/msdownload/update/software/secu/2012/06/windows6.1-kb2698365-x64_bf20bb36fc73c0d1f53ea1e635b8aa46c71d7b1f.cab . Software Updates Patch Downloader 7/25/2012 5:55:17 AM 10344 (0x2868)
Downloading content for ContentID = 9349,  FileName = windows6.1-kb2698365-x64.cab. Software Updates Patch Downloader 7/25/2012 5:55:17 AM 10344 (0x2868)
Download
http://download.windowsupdate.com/msdownload/update/software/secu/2012/06/windows6.1-kb2698365-x64_bf20bb36fc73c0d1f53ea1e635b8aa46c71d7b1f.cab in progress: 10 percent complete Software Updates Patch Downloader 7/25/2012 5:55:18 AM 9484 (0x250C)http://download.windowsupdate.com/msdownload/update/software/secu/2012/06/windows6.1-kb2698365-x64_bf20bb36fc73c0d1f53ea1e635b8aa46c71d7b1f.cab in progress: 61 percent complete Software Updates Patch Downloader 7/25/2012 5:55:18 AM 9484 (0x250C)Download http://download.windowsupdate.com/msdownload/update/software/secu/2012/06/windows6.1-kb2698365-x64_bf20bb36fc73c0d1f53ea1e635b8aa46c71d7b1f.cab in progress: 81 percent complete Software Updates Patch Downloader 7/25/2012 5:55:18 AM 9484 (0x250C)
Download
http://download.windowsupdate.com/msdownload/update/software/secu/2012/06/windows6.1-kb2698365-x64_bf20bb36fc73c0d1f53ea1e635b8aa46c71d7b1f.cab in progress: 91 percent complete Software Updates Patch Downloader 7/25/2012 5:55:18 AM 9484 (0x250C)
Download
http://download.windowsupdate.com/msdownload/update/software/secu/2012/06/windows6.1-kb2698365-x64_bf20bb36fc73c0d1f53ea1e635b8aa46c71d7b1f.cab to C:\Users\svc_sccm\AppData\Local\Temp\CAB1D33.tmp returns 0 Software Updates Patch Downloader 7/25/2012 5:55:19 AM 9484 (0x250C)
Checking machine config Software Updates Patch Downloader 7/25/2012 5:55:19 AM 9484 (0x250C)
Cert revocation check is disabled so cert revocation list will not be checked. Software Updates Patch Downloader 7/25/2012 5:55:19 AM 9484 (0x250C)
To enable cert revocation check use: UpdDwnldCfg.exe /checkrevocation Software Updates Patch Downloader 7/25/2012 5:55:19 AM 9484 (0x250C)
Authentication of file C:\Users\svc_sccm\AppData\Local\Temp\CAB1D33.tmp failed, error 0x800b0004 Software Updates Patch Downloader 7/25/2012 5:55:19 AM 9484 (0x250C)
ERROR: DownloadContentFiles() failed with hr=0x80073633 Software Updates Patch Downloader 7/25/2012 5:55:19 AM 10344 (0x2868)

it was happening for all patches and not to specific.

I was getting the same error message in windows update log file as stated above and as Microsoft strengthened the WSUS communication channels in the last month or so, which may explain why older patches worked but newer ones, are not working hence see here.

Additionally you can refer this article as well - See Here

However in my case, issue was still exist. I searched for KB 272011 but they havn't instaled it. So suggested to
install 2718704 and then 2720211

Also during my remote session, I noticed that any of Microsoft update link like http://gva1swparis.hq.intra.who.int:8530/SelfUpdate/wuident.cab downloading sucesfully However, the Digital Signature tab is missing from the file (go to properties, next to general TAB, it should show TAB for 'Digital Signature'. So Looks like there's a problem with the server itself. Since we move the same file to a different machine, we're able to see the Digital signature tab.

Also tried by changing security authentication mode but no sucess.

So, finally I resolved the issue. I have specified details below.

Cause:-

This problem may occur if one or more of the following conditions are true:
  • Log file or database corruption exists in the %Systemroot%\System32\Catroot2 folder.
  • Cryptographic Services is set to disabled.
  • Other Windows files are corrupted or missing.
  • The timestamp signature or certificate could not be verified or is malformed.
  • The hidden attribute is set for the %Windir% folder or one of its subfolders.
  • The Unsigned non-driver installation behavior Group Policy setting (Windows 2000 only) is set to Do not allow installation or Warn but allow installation, or the Policy binary value is not set to 0 in the following registry key:
    HKEY_LOCAL_MACHINE\Software\Microsoft\Non-Driver Signing
  • The Enable trusted publisher lockdown Group Policy setting is turned on, and you do not have the appropriate certificate in your Trusted Publishers certificate store. This Group Policy setting is located under User Configuration, under Windows Settings, under Internet Explorer Maintenance, under Security, under Authenticode Settings in the Group Policy MMC snap-in.
    Resolution:-
    1. Set Cryptographic Services to automatic, it was set to Manual earlier
    2. Rename catroot2 folder by stopping cryptsvc service, rename to oldcatroot2, start service again & then removed tmp *.cat files from
    %systemroot%\system32\CatRoot\{F750E6C3-38EE-11D1-85E5-00C04FC295EE}

    Note - If no files that start with tmp exist in this folder, do not remove any other files. The .cat files in this folder are necessary for installing hotfixes and service packs.
    3. Reregister the DLL files that are associated with Cryptographic Services
    Go to command prompt by 'Run as Administrator'
    regsvr32 /u softpub.dll
    regsvr32 /u wintrust.dll
    regsvr32 /u initpki.dll
    regsvr32 /u dssenh.dll
    regsvr32 /u rsaenh.dll
    regsvr32 /u gpkcsp.dll
    regsvr32 /u sccbase.dll
    regsvr32 /u slbcsp.dll
    regsvr32 /u mssip32.dll
    regsvr32 /u cryptdlg.dll
     if some files failed, ignore it for next try and restart the server
    Once done, again do same excercise and re-register following
    regsvr32 softpub.dll
    regsvr32 wintrust.dll
    regsvr32 initpki.dll
    regsvr32 dssenh.dll
    regsvr32 rsaenh.dll
    regsvr32 gpkcsp.dll
    regsvr32 sccbase.dll
    regsvr32 slbcsp.dll
    regsvr32 mssip32.dll
    regsvr32 cryptdlg.dll
    then restart box again.
    4. Remove the hidden attribute from %Windir% and from its subfolders
    Launch command prompt again with Administrator access and type following
attrib -s -h %windir%
attrib -s -h %windir%\system32
attrib -s -h %windir%\system32\catroot2
exit
    5. Rename EDB.Log file by launching command prompt
ren %systemroot%\system32\catroot2\Edb.log *.tst
    6. Temporarily turn off Trusted Publishers Lockdown and install the appropriate certificates to your trusted publishers certificate storeYou can continue to use the Enable trusted publisher lockdown Group Policy setting, but you must first add the appropriate certificates to your Trusted Publishers certificate store. To do this, turn off the Enable trusted publisher lockdown Group Policy setting, install the appropriate certificates in your Trusted Publishers certificate store, and then turn the Enable trusted publisher lockdown Group Policy setting back on. To install the appropriate certificate for Microsoft Windows and Microsoft Internet Explorer product updates, follow these steps:
    1. Download the Microsoft product update that you want to install from the Microsoft Download Center, from the Windows Update Catalog, or from the Microsoft Update Catalog. For more information about how to download product updates from the Microsoft Download Center, click the following article number to view the article in the Microsoft Knowledge Base:
      119591 How to obtain Microsoft support files from Online Services
      For more information about how to download product updates from the Windows Update Catalog, click the following article number to view the article in the Microsoft Knowledge Base:
      323166 How to download updates that include drivers and hotfixes from the Windows Update Catalog
    2. Extract the product update package to a temporary folder. The command-line command that you use to do this depends on the update that you are trying to install. View the Microsoft Knowledge Base article that is associated with the update to determine the appropriate command-line switches that you will use to extract the package. For example, to extract the 824146 security update for Windows XP to the C:\824146 folder, run Windowsxp-kb824146-x86-enu -x:c:\824146. To extract the 828750 security update for Windows XP to the C:\828750 folder, run q828750.exe /c /t:c:\828750.
    3. Right-click the KBNumber.cat file from the product update package in the temporary folder you created in step 2, and then click Properties.

      Note The KBNumber.cat file may be in a subfolder. For example, the file may be in the C:\824146\sp1\update folder or in the C:\824146\sp2\update folder.
    4. On the Digital Signatures tab, click the digital signature and then click Details.
    5. Click View Certificate, and then click Install Certificate.
    6. Click Next to start the Certificate Import Wizard.
    7. Click Place all certificates in the following store, and then click Browse.
    8. Click Trusted Publishers, and then click OK.
    9. Click Next, click Finish, and then click OK.

    7. Verify the status of all certificates in the certification path and import missing or damaged certificates from another computerTo verify certificates in the certificate path for a Windows or Internet Explorer product update, follow these steps:

    Step 1: Verify Microsoft certificates

    1. In Internet Explorer, click Tools, and then click Internet Options.
    2. On the Content tab, click Certificates.
    3. On the Trusted Root Certification Authorities tab, double-click Microsoft Root Authority. If this certificate is missing, go on to step 2.
    4. On the General tab, make sure that the Valid from dates are 1/10/1997 to 12/31/2020.
    5. On the Certification Path tab, verify that This certificate is OK appears under Certificate Status.
    6. Click OK, and then double-click the NO LIABILITY ACCEPTED certificate.
    7. On the General tab, make sure that the Valid from dates are 5/11/1997 to 1/7/2004.
    8. On the Certification Path tab, verify that either This certificate has expired or is not yet valid or This certificate is OK appears under Certificate Status.

      Note Although this certificate is expired, the certificate will continue to work. The operating system may not work correctly if the certificate is missing or revoked.
    9. Click OK, and then double-click the GTE CyberTrust Root certificate. You may have more than one of these certificates with the same name. Check the certificate that has an expiration date of 2/23/2006.
    10. On the General tab, make sure that the Valid from dates are "2/23/1996 to 2/23/2006."
    11. On the Certification Path tab, verify that This certificate is OK appears under Certificate Status.
      Click OK, and then double-click Thawte Timestamping CA.
    12. On the General tab, make sure that the Valid from dates are "12/31/1996 to 12/31/2020."
    13. On the Certification Path tab, verify that This certificate is OK appears under Certificate Status.

    Step 2: Import missing or damaged certificates

    If one or more of these certificates are missing or corrupted, export the missing or corrupted certificates to another computer, and then install the certificates on your computer. To export certificates on another computer, follow these steps:
    1. In Internet Explorer, click Tools, and then click Internet Options.
    2. On the Content tab, click Certificates.
    3. On the Trusted Root Certification Authorities tab, click the certificate that you want to export.
    4. Click Export, and then follow the instructions to export the certificate as a DER encoded Binary x.509(.CER) file.
    5. After the certificate file has been exported, copy it to the computer where you want to import it.
    6. On the computer where you want to import the certificate, double-click the certificate.
    7. Click Install certificate, and then click Next.
    8. Click Finish, and then click OK.
   8. Clear the temporary file and restart the hotfix installation or the service pack installation
To clear the temporary file and restart the hotfix installation or the service pack installation, follow these steps:

  1. Delete all the tmp*.cat files in the following folders:

    %systemroot%\system32\CatRoot\{127D0A1D-4EF2-11D1-8608-00C04FC295EE}

    %systemroot%\system32\CatRoot\{F750E6C3-38EE-11D1-85E5-00C04FC295EE}
  2. Delete all the kb*.cat files in the following folders:
    %systemroot%\System32\CatRoot\{F750E6C3-38EE-11D1-85E5-00C04FC295EE}
    %systemroot%\System32\CatRoot\{127D0A1D-4EF2-11D1-8608-00C04FC295EE}
  3. Delete all the oem*.* files from the %systemroot%\inf folder.
  4. At the command prompt, type the following commands. Press ENTER after each command.
    net stop cryptsvc
    ren %systemroot%\System32\Catroot2 oldcatroot2
    net start cryptsvc
    exit
  5. Restart the failed hotfix installation or service pack installation.
9. Empty the software distribution folder
  1. Click Start, click Run, type services.msc, and then click OK.

    Note On a Windows Vista-based computer, click Start, type services.msc in the Start Search box, right-click services.msc, and then click Run as administrator.
  2. In the Services (Local) pane, right-click Automatic Updates, and then click Stop.
  3. Minimize the Services (local) window.
  4. Select all the contents of the Windows distribution folder, and then delete them.

    Note By default, the Windows distribution folder is located in the drive:\Windows\SoftwareDistribution folder. In this location, drive is a placeholder for the drive where Windows is installed.
  5. Make sure that the Windows distribution folder is empty, and then maximize the Services (local) window.
  6. In the Services (Local) pane, right-click Automatic Updates, and then click Start.
  7. Restart the computer, and then run Windows Update again.
By following all above step by step, it helped me to resolved my issue.

Microsoft System Center Operation Manager 2012 - Alert subscription doesn't work with custom parameter

I recently worked on SCOM 2012 case which was very intresting to work upon, after initial basic troubleshooting, collaborated with Microsoft and worked together, so I thought good to share here if anyone face this issue.

Issue-
Alert subscription doesn't work if select "with specific text in description" and specifying any parameter like - %test%.


OS - Microsoft Windows 2008 R2
Application - Microsoft SCOM 2012 (System Center Operation Manager)

But able to receive email if removing filter.

Information:-

By Design, if configure the criteria with the first word mentioned in the “Alert Description” the subscription works. If select any other word mentioned in the alert details, the subscription doesn’t work. So it meants, if the alert description field is not generated by custom fields it will work as expected. If the Alert description has any information which is generated by custom fields it will not work.

Here in the above example, in the Alert Description section, have certain details. And “Source”, “Path”, “Alert Rule” they are in different section. This is the default configuration. If don’t have anything with the targeted keyword in the “Alert Description” section the subscription will fail. If have the targeted keyword in any place other than “Alert Description” section and in “Subscription Criteria”  selected “With Specific text in description” the alert will never send a notification. So will have to edit the Alert properties to add some Alert Description with the desired keyword.
Cause: 

This is found to be the design of the product and is a BUG. This is only reproducible when the Criteria "With specific text in description" is set to a variable in the description. Any static text in the description will work as expected.    

For example, if create a rule that is triggered for Event ID 644, and assign the Alert description as "Event ID for NotificationRule: $Data/EventID$".   When the alert shows up, can see alert description as - "Event ID for NotificationRule: 644"     Under this condition: If criteria for description text is "%NotificationRule%" for example, the notification will be sent. If criteria for description text is "%644%" the notification will not be sent, because the 644 is a variable.
- When create a Notification Subscription with the option selected as - "With specific text in description", the following is being logged as a criteria in the Notification Internal Library:  -----------------------------------------------------  <Expression>                        <SimpleExpression>                          <ValueExpression>                            <Property>AlertDescription</Property>                          </ValueExpression>                          <Operator>Equal</Operator>                          <ValueExpression>                            <Value>Pradeep</Value>                          </ValueExpression>                        </SimpleExpression>                      </Expression>                    </And>  ----------------------------------------------------- 

Whereas if used any variable in the alert description (while creating the Rule or Monitor), the Alert description will look like:
"The threshold for the Memory \ % Used Memory counter on computer {0} has been exceeded. The value that exceeded the threshold is: {1} "  -- [Example for Memory threshold]    Inside the DB all these information’s will go to the 'Dbo.Alert' table, the static content will go to 'AlertDescription' column. Where-as the variable output will go to 'AlertParams' column in the dbo.alert  table. This is where it fails for sending the notification, as the query looks at 'AlertDescription' column but the entry itself is in different column ('AlertParams'). 

Resolution: 

So far no solution to this (it is a bug) but the following workaround. 
After creating the notification, can manually modify the Notification MP XML to search at the required location and reimport this MP. However, with every change in the notification (in console) then need have to modify the MP manually again. Export the MP>Modify the expression to reflect the 'AlertParams' column>save the changes>Import the MP into configuration.   Or not to use dynamic contents/variables for alert description generation. 

Thursday, July 19, 2012

Microsoft SQL 2008 - SQL agent log bugging with ODBC error - Could not open connection to SQL server.


I have received one of my customer problem and trouble shoot it till closure hence good to share here with step by step I performed.


Issue:
Microsoft SQL 2008 being used in Clustered with Mixed mode authentication and did modifications like, 
Order of connection, TCP id first than Named pipes
Tried by putting Alias name as a Cluster name and then restart agent service but didn't help.


Troubleshoot Step by step:


http://msdn.microsoft.com/en-us/library/ms175176.aspx   - By default, the SQL Server Agent service connects to an instance of SQL Server over named pipes by using dynamic server names that require no additional client configuration.

Please check if it connects the database with SQL Server ODBC drivers. You can start ODBC connection wizard from control panel, select new & then SQL server. At the end, it will show option of ‘Validate Test’ where you can check if it connects to SQL with ODBC drivers by looking test get success or failed.

However in my case, validation test was successful


So proceed further with next step.

There are a couple of things which we can check, that might be going on this case… (All of the following configurations are made on the computer running your SQL Server 2008 instance)
Allow remote connections to this server
The first thing you want to check is if Remote Connections are enabled on your SQL Server database.
To do this, open SQL Server 2008 Management Studio, connect to the server in question, right click the server…and open the Server Properties.


Navigate to Connections and ensure that Allow remote connections to this server is checked. Check if this solves the problem. If it does, here you go, continue with whatever you were doing and have a nice day.
Protocols for MSSQLServer
If you’re still running in issues let’s dig a bit deeper. The next good thing to check is the SQL Server Network Configuration. Open the SQL Server Configuration Manager, unfold the node SQL Server Network Configuration and select Protocols for MSSQLServer (or whatever the name of your SQL Server instance is).


Make sure that TCP/IP is enabled and try again. Even though I hope that this resolved your problems there might still be an issue with…
The Firewall
If there is still no communication happening between your computer and the remote SQL Server you most likely need to configure your firewall settings. A good first step is to figure out which port is being used by TCP/IP (and which you need to open in your firewall). You can do this by right clicking TCP/IP and selecting Properties.


Click on the tab IP Addresses – Port 1433 it is :-) That was easy enough and all there is left to do is to allow inbound TCP/IP traffic on Port 1433 in your firewall. In Windows 7 this works something like this. Open the Control Panel and navigate to Windows Firewall.


Click on Advanced Settings on the left hand side and you should see the Windows Firewall with Advanced Security. Select the Inbound Rules on the left hand side and click on New Rule… on the right hand side.


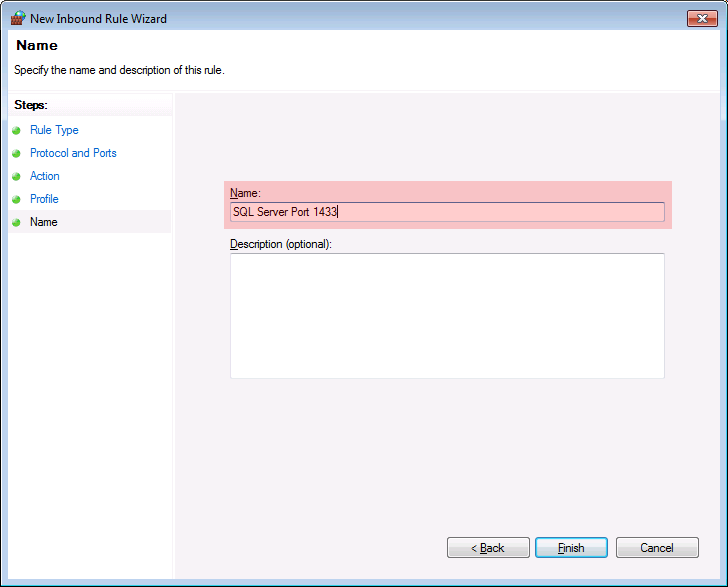
This opens the New Inbound Rule Wizard which you can use to allow inbound traffic on Port 1433 for TCP/IP (and which is exactly how you configured your SQL Server in the steps above). Just follow the steps outlined below.)


By performing above steps, it lead to resolved my issue.


Microsoft System Centre Operation Manager (SCOM) 2007 R2 - Heartbeat failing randomly from any Management Servers to Any Clients.


Environment:
Operating System - Microsoft Windows 2008 R2 Enterprise
Database - Microsoft SOL 2008 
Application - Microsoft SCOM 2007 R2 with Management server in Clusters.


Issue is, Heartbeat failing randomly from any Management servers to any of clients with event 20022 which caused by many of the reasons like network issue, server performance issue etc... In this case, I faced this issue and troubleshoot it step by step as specified below.


To analyse if the issue happens at network side, I have provided steps to collect data below

Disable TCP Chimney
======================
Please help disable TCP chimney on MS,RMS and the SQL server as a best practice. Some more information of TCP chimney is shared below:
http://support.microsoft.com/default.aspx?scid=KB;en-us;q945977


Run SQL Queries Below
Please launch SQL management studio and run below queries then save the result to .csv file and send them to me.
Use operationsmanager
SELECT so.name,
8 * Sum(CASE WHEN si.indid IN (0, 1) THEN si.reserved END) AS data_kb,
Coalesce(8 * Sum(CASE WHEN si.indid NOT IN (0, 1, 255) THEN si.reserved END), 0) AS index_kb,
Coalesce(8 * Sum(CASE WHEN si.indid IN (255) THEN si.reserved END), 0) AS blob_kb
FROM dbo.sysobjects AS so JOIN dbo.sysindexes AS si ON (si.id = so.id)
WHERE 'U' = so.type GROUP BY so.name  ORDER BY data_kb DESC

Use operationsmanagerDW
SELECT so.name,
8 * Sum(CASE WHEN si.indid IN (0, 1) THEN si.reserved END) AS data_kb,
Coalesce(8 * Sum(CASE WHEN si.indid NOT IN (0, 1, 255) THEN si.reserved END), 0) AS index_kb,
Coalesce(8 * Sum(CASE WHEN si.indid IN (255) THEN si.reserved END), 0) AS blob_kb
FROM dbo.sysobjects AS so JOIN dbo.sysindexes AS si ON (si.id = so.id)
WHERE 'U' = so.type GROUP BY so.name  ORDER BY data_kb DESC

Network Logs
=============
Capture Network trace or run Netmon tool.......

1. On the selected machine and SCOM MS, download and install Network monitor 3.4
2. Run below command on both servers
nmcap /network * /capture /file <drive letter>:\nmcap.chn:200M
NOTE: Above command may generate a great number of files with 200M size. Please select a drive with sufficient free disk space and monitor the disk usage regularly.
3. Once MS reported event 20022 and the machine name is listed in the event 20022 , then please press Ctrl+C on both servers  to stop nmcap, save it as a file.

MS Tracing Log
======================
1. On MS server, replace C:\Program Files\System Center Operations Manager 2007\Tools\TracingGuidsNative.txt by attached one.
2. Open a command window MS server, change directory to C:\Program Files\System Center Operations Manager 2007\Tools
3. Run "Starttracing.cmd VER".
4. Wait until issue happens.
5. Run "stoptracing.cmd"
6. Run "formattracing.cmd"
7. Compress all files under C:\Windows\Temp\OpsMgrTracing 
8. Please also export Operations Manager event logs from MS and RMS (Root Management Server) 

Analysis
To work around this issue, I also suggested to set "Number of missed heartbeats allowed" to 10 from SCOM server.
By doing that, we can at least fix some false alert and still can get the correct information if MS or agents are done.

The issue still persists even after implementing above changes, so collected performance monitor log to trace the performance.
From that performance log, most the system resource, like CPU and Memory, are running at healthy level. but, the disk performance is not very good, especially on C and D. (as have 2 drives)
1.       On driver C, the Data transfer rate is not very high (average less than 1MB) but the disk queue length is pretty high. Also, every IO on that disk on takes about 0.2sec to be completed which is not a very good performance.
2.       On driver D, the IO load is much higher. About 6MB data transferred every second and most of these IO load comes from HealthService. The time to complete every IO request is similar with C driver (about 0.2-0.3sec, even reach to 1sec at the peak time)

By comparing the registry setting, I have noticed the RMS cluster node B Health Service Store is located on D: drive, which is a local drive. On A node, it’s on J: drive, which is on SAN, shared between both nodes. I noticed below reg key is configured differently:

On Node A:


On Node B:


This probably contributed to the disk IO issue as health service state should be on J: drive instead.

Solution
Changing above "State Directory" to SAN disk, issue is resolved now.


The Service Host process (Svchost.exe) that hosts the Computer Browser service and the Server service stops unexpectedly in Microsoft Windows Server 2003

Symptoms:

In Microsoft Windows 2003 X64 R2 SP2, unable to start Browser and Server service, error – “Access Denied”

While you restart the box, both will start automatically but not starting manually, it throws an error – Access Denied.

Cause:

In some of 2003 box, browser DLL file not upgraded during patching for some issues and then running with older version which conflict with latest OS file sub system and cause this issue. It may also cause due to other issue example if some third-party server becomes the master browser. When a Windows-based server is the master browser, it does not let any host that is advertising its share to use a server comment that is larger than 48 bytes. When a third-party server message block (SMB) server becomes the master browser, it lets a host use a server comment that is larger than 48 bytes. In this case, when a Windows Server receives and tries to process the browser list, the Server service crashes. This behavior occurs because there is an overflow that eventually leads to a heap corruption

Resolution:

Check Browser.dll file with version, it will look like,

Module Path: C:\WINDOWS\SYSTEM32\BROWSER.DLL
Symbol Status: SYMBOLS_PDB
Time/Date String: "February 17, 2007 15:03:41"
Product Version: (5.2:3790.3959)
File Version: (5.2:3790.3959)
Company Name: Microsoft Corporation
File Description: Computer Browser Service DLL

Whereas newer version is - 5.2.3790.4040

So, action plan is to upgrade file to its latest version for specific OS running on the box.

Update for Windows Server 2003
Update for Windows Server 2003 for Itanium-based Systems
Update for Windows Server 2003 x64 Edition
Update for Windows XP x64 Edition


Symptom:
In SCOM 2012, we cannot discover windows computers as network devices, so the SNMP trap send from Windows computers can be received by SCOM management server.

Analysis:
After discussing with the owner of network monitoring in Operations Manager product group, I personally confirmed it’s not possible to monitor SNMP traps from a windows computer via SNMP monitors.

I also learnt that the reason to filter the windows computers out of network discovery is because after we introduced network monitoring in OM 2012, a device is either a network device or a computer, if we support SNMP on a Windows computer, the same device will be discovered twice, once as a Windows computer, once as a network device and this will cause problem.

So in this scenario, we will need to use other mechanism to receive the trap and generate alert.

Alternate Way:
1.       Customize the application to send alert via other method like eventlog.
2.       Use other solution to receive the trap and call SCOM API to generate a property bag, and SCOM can receive this and generate alert.

Monday, June 25, 2012

Users are facing delay in logging in to a Terminal server via RDP client. After entering the credentials, they are seeing a long delay before they get the desktop

Problem:

In Windows 2003 SP2 x64 bit R2 server, faced issue with Terminal services.
Users are facing delay in logging in to a Terminal server via RDP client. After entering the credentials, they are seeing a long delay before they get the desktop

Also apart from above, amazing part has been observed that few initial users were able to access desktop and taskbar after credential in terminal session but from next user onwards, noone will get desktop, just a blank screen and almost to wait for 30 to 40 minutes.

More info: While troubleshooting, we found that few users who RDP to the server will get a desktop and few of them actually never get a desktop. The users who get the 3rd party application launched when the login will never get a desktop. Rather they get the application which will close the explorer.exe as soon as it starts off. The application has an option to logoff within the tool bar of the application itself and that will trigger the log off process and close the RDP session.

So, for users who gets desktop, we see delay in getting the desktop. For the users who gets the application interface, we see delay in getting the application interface.

Cause: We found two different issues in this case. The first  one is due to couple of 3rd party HP services running, namely “Net Driver HPZ12” and “PML Driver HPZ12” which has bloated the registry entries under following registry locations.
[ HKLM\SOFTWARE\Microsoft\Windows NT\CurrentVersion\Terminal Server\Install\Software\Hewlett-Packard\ ]
[ HKLM\SOFTWARE\Microsoft\Windows NT\CurrentVersion\Terminal Server\Install\RefHive\Hewlett-Packard\ ]
[ HKU\.DEFAULT\Software\Hewlett-Packard ]

When the user logs into RDP session, due to the above bloated registry, we were waiting for the enumeration of the subkeys / entries under the above keys. Once we enumerate all entries here, the login process will then complete and eventually user will get desktop or application interface.

Due to the large number of entries here, it was taking a long time to complete this process. However, these entries are not required for regular working for the users as they got created by the above mentioned HP services.

We also found another issue being caused by the 3rd party application init.exe which will be initiated for those users who get the application interface. Randomly the init.exe stops responding at the startup when the users login. In this instance, we see that userinit.exe which will start the explorer.exe is done with its job and exited. But the init.exe which is supposed to close the explorer.exe and initiate the Application Interface is not completing and is hung. We are not sure what exactly it is doing and this has to be investigated by the application owner / vendor. But we see this issue very randomly and during our testing we found this init.exe getting stuck only once.

Solution:
For the registry bloat issue by HP service, we followed the action plan outlined below.

1.      Stop and disable HP services “Net Driver HPZ12” and “PML Driver HPZ12
2.      Rename the associated .msi file (cioum64.msi) of the above service under C:\windows\system32\spool\drivers\x64\3\ to cioum64.old and created a blank dummy cioum64.msi (created blank cioum64.txt and renamed it as cioum64.msi)
3.      Deleted the following bloated registry entries which are actually not required for server operation and deleting them won’t cause any harm to the server.
HKLM\SOFTWARE\Microsoft\Windows NT\CurrentVersion\Terminal Server\Install\Software\Hewlett-Packard
HKLM\SOFTWARE\Microsoft\Windows NT\CurrentVersion\Terminal Server\Install\RefHive\Hewlett-Packard
HKU\.DEFAULT\Software\Hewlett-Packard

After doing this, we successfully logged in with couple of users who gets the desktop (not the application interface when they login) and did not see anymore delay in getting desktop. We logged them in within 1 min which is good enough.
We tried logging in around 4 – 5 users who get the application interface, at one instance we found that “init.exe” hung and did not get interface. Killing that hung init.exe will close the session for the user.
For all other attempts to login the same user and other users who gets application interface, we did get the application launched without any problem.

So if you see similar issue of such users not getting application when they login and their session getting stuck on “Init.exe” which spikes CPU to 25%, we have to engage application owner / vendor.
 

Tuesday, January 24, 2012

Error - "Consider replacing your Battery" displayed immediately after you upgrade to Windows 7 on certain LG notebooks

If you get below error on your LG notebook (certain model's) as stated below, follow the steps mentioned.

A warning message is displayed immediately after you upgrade to Windows 7 on certain LG notebooks: "Consider replacing your battery"

This warning is displayed even if a new battery is inserted into the laptop.


CAUSE:


This problem occurs because of a code defect in the system firmware (BIOS) of some LG notebooks. These include the R500 family of notebooks.


The Advanced Configuration and Power Interface (ACPI) firmware does not correctly initialize and report the Design Capacity field of the static battery information structure that is retrieved by using the _BIF method. Therefore, the Design Capacity that is reported to Windows may be much larger than the Last Full Charge capacity that is also reported in the static battery information structure. The Windows Battery Meter divides the Last Full Charge capacity by the Design Capacity to determine battery health. The Windows Battery Meter displays the "Consider replacing your battery" message when the Last Full Charge Capacity is less than 40% of the Design Capacity. When this issue occurs, the Design Capacity is reported as much larger than Last Full Charge capacity. Therefore, the "Consider replacing your battery" message is always shown.


RESOLUTION:


To resolve this problem, You need to upgrade BIOS for your LG Notebook.
For more information, visit the following LG Web sites:

Internet Explorer Issue - Nothing happens when you click a link in Internet Explorer

When you click a hyperlink on a webpage or in an email message, nothing happens. Internet Explorer does not open the webpage.

CAUSE:


This behavior may occur for one or more of the following reasons:
  • A corrupted browser choice setting may cause Windows to misinterpret which browser is set as the default browser on your computer.
  • Settings were changed after a software installation that cause webpages not to work correctly.
  • A previously installed browser or add-on may be interfering with other software on your computer.
  • Registry key were changed or became corrupted.

RESOLUTION:

Method 1: Check your default web browser setting
In Microsoft Windows, you can select which web browser to use by default. To make Internet Explorer your default web browser, follow these steps:
  1. To open Internet Explorer, click Start, and then click Internet Explorer.
  2. If you are prompted whether you want Internet Explorer to be your default browser, click Yes. This is all that you have to do.
    If a message does not appear, go to the next step.
  3. Click the Tools button, and then click Internet Options.
  4. Click the Programs tab, and then click Make default.
  5. Click OK, and then close Internet Explorer.

    Note Your changes will take effect the next time that you start Internet Explorer.
Check whether the problem is resolved. If the problem is resolved, you are finished with this article. If the problem is not resolved, try the next method.

Method 2: Change the file types that Internet Explorer opens by default

For Windows 7 and Windows Vista

  1. Close any Internet Explorer windows that are open.
  2. Click Start, and then click Control Panel.
  3. Click Programs, and then click Set your default programs.
  4. On the Programs menu, click Internet Explorer, and then click Choose defaults for this program.
  5. Make sure that the check boxes for .htm, .html, and .url are selected, and then click Save.
  6. Click OK.

    Note Your changes will take effect the next time that you start Internet Explorer.
For Windows XP
  1. To open Windows Explorer, right-click Start, and then click My Computer.
  2. On the Tools menu, click Folder Options, and then click the File Types tab.
  3. Locate and select the HTM file type.
  4. Make sure that Internet Explorer is selected as the Opens with program. If Internet Explorer is not selected, click Change, select Internet Explorer as the recommended program, and then click OK.
  5. Repeat steps 3 and 4 for the following file types:

    HTML
    ITS
    MHT
    MTHML
    XML
    XSL
Check whether the problem is resolved. If the problem is resolved, you are finished with this article, If the problem is not resolved, go to the next method.
Although browser add-ons can improve your online experience, they can occasionally interfere or conflict with other software on your computer. However, be aware that some webpages, or Internet Explorer itself, might not be displayed correctly if an add-on is disabled. First, start Internet Explorer with add-ons temporarily disabled to see whether the problem is resolved. (Add-ons will be disabled only until you restart Internet Explorer in the usual way). To do this, follow these steps:

Method 3: Use the Internet Explorer (No Add-ons) mode


  • Click Start, type Internet Explorer in the Search box, and then click Internet Explorer (No Add-ons).

    Note For Windows XP, click Start, right-click the Internet Explorer icon, and then click Browse without add-ons.
If Internet Explorer No Add-ons resolves the problem, follow these steps to identify the browser add-on that is causing the problem:
  1. To start Internet Explorer, click Start, and then click Internet Explorer.
  2. Click the Tools button, and then click Manage add-ons.
  3. Click an add-on in the Name list, and then click Disable. Test Internet Explorer.
  4. Repeat step 3 until you identify the add-on that is causing the problem.
Check whether the problem is resolved. If the problem is resolved, you are finished with this article. If the problem is not resolved, try the next method.

Method 4: Reset Internet Explorer settings

If the problem is caused by damaged or incompatible Internet Explorer settings or add-ons, you can usually resolve the problem by resetting Internet Explorer settings to their default settings.

Resetting Internet Explorer’s settings is not reversible. After a reset, all previous settings are lost and cannot be recovered. When you restore Internet Explorer’s default settings, some webpages that rely on previously stored cookies, form data, passwords, or previously installed browser add-ons might not work correctly. However, resetting Internet Explorer to its default settings does not delete your favorites, feeds, or several other personal settings.

To Reset Internet Explorer Settings, follow these steps:

  1. Close all open Internet Explorer windows.
  2. Click Start, type inetcpl.cpl in the Search box and then click inetcpl.cpl in the programs list.
    The Internet Options dialog box appears.

    Note for Windows XP, click Start, click Run, type inetcpl.cpl in the Open box, and then click OK.
  3. Click the Advanced tab.
  4. Under Reset Internet Explorer Settings, click Reset. Then click Reset again.
  5. When Internet Explorer finishes resetting the settings, click Close in the Reset Internet Explorer Settings dialog box.
  6. Start Internet Explorer again.
    Your changes will take effect the next time you open Internet Explorer.

    Note Your changes will take effect the next time that you start Internet Explorer.

Method 5: Reregister the necessary Internet Explorer DLL files 

Note This information applies to Windows XP

To reregister the DLL files, follow these steps:

  1. Click Start, click All Programs, click Accessories, right-click cmd, and then select Run as administrator. If you are prompted for an administrator password or confirmation, type the password or provide confirmation.
  2. Type regsvr32 urlmon.dll in the Open box, and then click OK.
  3. Click OK when you receive the confirmation.
  4. Repeat steps 2 and 3 for the following commands:

    regsvr32 mshtml.dll
    regsvr32 shdocvw.dll
    regsvr32 browseui.dll
    regsvr32 msjava.dll
Check whether the problem is resolved. If the problem is resolved, you are finished with this article. If the problem is not fixed, go to the next section.

Error message when you try to install an Office program: "Error 1935. An error occurred during the installation of assembly component

When you install one of the Microsoft Office programs,the installation is not completed successfully. Additionally, you receive an error message that resembles the following: 


"Error 1935. An error occurred during the installation of assembly component {10CD20D2-733E-4174-9D02-2C6C26163DA5}"
The error message contains a global unique identifier (GUID) of an assembly that is contained in the 2007 Office program. The GUID in the error message may vary, depending on which assembly encounters the error.
CAUSE:
This issue may occur when the Microsoft .NET Framework installation on the computer is damaged or is missing.

RESOLUTION:
To resolve this issue, use one of the following methods, as appropriate for your situation. Then, try to install the 2007 Office program again.

These methods are supported on the following Operating System versions:

Methods 1 and 3:

  • Windows XP
  • Windows Server 2003
  • Windows Vista
  • Windows Server 2008
Method 2:
  • Windows XP
  • Windows Server 2003

Method 1: Repair the Microsoft .NET Framework version 2.0 installation

To repair the Microsoft .NET Framework version 2.0 installation, follow these steps:
  1. Click Start, click Control Panel, and then click Add or Remove Programs.
  2. In the Currently installed programs list, click Microsoft .NET Framework 2.0, and then click Change/Remove.
  3. Click Repair, and then click Next.

Method 2: Install the .NET Framework version 2.0

If a version of the .NET Framework is not installed on your computer, download and install the .NET Framework version 2.0 from this website (http://www.microsoft.com/downloads/details.aspx?FamilyID=0856eacb-4362-4b0d-8edd-aab15c5e04f5) .

Method 3: Reinstall the Microsoft .NET Framework version 1.1

If the .NET Framework version 1.1 is installed, remove it, and then reinstall it.

To remove the .NET Framework version 1.1, follow these steps:

  1. Click Start, click Control Panel, and then click Add or Remove Programs.
  2. In the Currently installed programs list, click Microsoft .NET Framework 1.1 and then click Change/Remove.
  3. Click Yes to uninstall the .NET Framework version 1.1.
To reinstall the .NET Framework version 1.1, download and install the .NET Framework version 1.1 from this website (http://www.microsoft.com/downloads/details.aspx?FamilyID=262d25e3-f589-4842-8157-034d1e7cf3a3)


How to determine whether you have a retail edition or a volume license edition of a 2007 or a 2010 Microsoft Office suite

To determine whether you have a retail edition or a volume license edition, use one of the following methods.

Method 1: Examine the contents of the installation disc

  1. Insert the 2007 or 2010 Office suite installation disc into the computer's CD drive or DVD drive.

    Note If you have multiple discs, use disc 1. Also, check the disc label for the DVD symbol. If you see this symbol, the disc must be inserted into a DVD drive.
  2. When the Setup window is displayed, close the Setup window.
  3. Click Start, and then click My Computer.
  4. Right-click the CD drive or the DVD drive that contains the disc, and then click Explore.
  5. Look for a folder that is named Admin.
    • If the Admin folder exists, this disc is a volume license edition.
    • If the Admin folder does not exist, this disc is a retail edition.
    Note Retail media includes a lowercase "r" before the ".WW" in the folder name and before the "WW.msi" in the msi file name. For example, Enterprise retail would be EnterpriserWW.msi in the Enterpriser.WW folder. Enterprise non-retail would be EnterpriseWW.msi in the Enterprise.WW. Notice the absence of the lowercase "r" in the non-retail names.

Method 2: Examine the registry on the computer

Warning Serious problems might occur if you modify the registry incorrectly by using Registry Editor or by using another method. These problems might require that you reinstall the operating system. Microsoft cannot guarantee that these problems can be solved. Modify the registry at your own risk.
  1. On a computer that has a 2007 or a 2010 Office suite installed, click Start, click Run, type regedit, and then click OK.
  2. Locate and then click the following registry subkey:
    HKEY_LOCAL_MACHINE\Software\Classes\Installer\Products
  3. Expand the Products entry node in the navigation area, and then click each 32-character {GUID} until you locate the one whose ProductName value in the topic area matches your version of the 2007 or 2010 Office suite. For example, the 32-character {GUID} for Microsoft Office Professional Plus 2007 appears as follows: 
    00002103110000000000000000F01FEC
  4. For more information about 2007 Office suite ProductName GUIDs, click the following article number to view the article in the Microsoft Knowledge Base:
    928516  (http://support.microsoft.com/kb/928516/ ) Description of the numbering scheme for product code GUIDs in 2007 Office suites and programs
    2186281 (http://support.microsoft.com/kb/2186281) Description of the numbering scheme for product code GUIDs in Office 2010
  5. Expand the selected 32-character GUID entry.
  6. Click the SourceList entry.
  7. In the topic area, examine the data for the PackageName string value.
    • If the data for this string value contains the letter "r" before "WW," this is a retail edition of a 2007 Office suite. For example, the data may be displayed as "ProrWW.msi" or as "StandardrWW.msi."
    • If the data for this string value does not contain the letter "r" before "WW," this is a volume license edition of a 2007 Office suite. For example, the data may be displayed as "ProWW.msi" or as "StandardWW.msi."
  8. Exit Registry Editor.